Tuesday, 31 July 2018
How to Recover Deleted Photos & Files from iPhone iPad
Have you ever lost photos, or accidentally deleted photos from your iPhone/iPad/iPod Touch but don’t know how to recover them? You tried several ways in Apple forum but are still in a mess because they didn’t help? Well, relax from now! In this post, we will guide you in recovering deleted photos from an iOS device using PhoneRescue that is available for both Mac and Windows.
There comes a certain scenario where important photos on our iOS device get deleted. Pictures from photo library or iCloud might disappear while you are trying to Jailbreak your iPhone. Or the device becomes completely unresponsive while after you upgrade to a new iOS. Or sometimes your iOS device gets lost or stolen, in such case we lose all the great memories and important pictures that we had on our iPhone.
But there is nothing to worry even these cases arise. Now, you can recover all the lost/deleted photos from your iOS devices with an amazing software called “PhoneRescue” from iMobie.
PhoneRescue for iPhone, a unique software can recover lost/deleted photos and even other essential things such as messages, contacts, notes, call logs and so on from your iPhone, iPad or iPad Touch in just three steps. Just Connect your iOS Device – Scan & Preview Deleted Files & Photos – Recover it! Isn’t it easy?
This amazing application has three powerful options to recover lost/deleted files & photos from your iOS device. You can either recover deleted files & photos using your iOS device, iTunes Backup or even iCloud Backup.
Let’s break them down all to get a clearer idea on how it works:
Recover from iPhone
Use this option to recover deleted files from your iPhone such as photos, contacts, messages, reminders, calendars, notes etc. Remember, your device must be in working condition and detected by PhoneRescue software. After a successful connection, you can recover deleted files from your iPhone, iPad and iPod Touch even if you have forgotten your device’s passcode.
Recover from iTunes Backup
There might be a case where your device gets damaged, stolen, lost or doesn’t respond at all. But if you have backed up your device on iTunes, then you don’t have to worry at all. In that case, the “Recover from iTunes Backup” option will save you. It can recover data from all the iTunes backups that are available on your computer.
Recover using iCloud Backup
This option is similar to “Recover from iTunes Backup”. The only difference is you use iCloud account to recover files from iCloud. All you need to do is enter the Apple ID and Password of an iCloud account where you use to back up all the files on your iPhone/iPad and PhoneRescue will do the rest of things for you.
Sponsor Ads:
Gihosoft Free iPhone Data Recovery is a professional iPhone Data Recovery software to get back all your lost text message, photo, video, call history, note, contact and more from iPhone/iPad/iPod Touch. It offers a full solution to recover your lost data in different tough situations. Besides recovering data directly from iPhone, iPad and iPod touch, it also allows you to recover data from iCloud and iTunes backup files.
iPhone backup unlocker:Recover iTunes Backup Password.
iPhone backup extractor free:The best iPhone Backup Extractor software to extract photos, text messages, contacts, voice memos, note, WhatsApp, Viber and etc from iPhone/iPad backup.
How to Fix Can’t Close Apps on Your iPhone X in iOS 12
How to Fix Can’t Close Apps on Your iPhone X in iOS 12
1Force Quit Multiple Apps at One Time
One of the basic options you can try to fix “Can’t close apps on iPhone” is to force quitting multiple apps. Here’s how to do it on iPhone X.

Launch the app switcher by swiping up the screen from the bottom to top.
You will have to tap and hold the card of the very first app you need to stop. Hold until you see a minus sign.
Don’t release. Use two more fingers to hold on two adjacent cards you wish to stop. Meanwhile, you should swipe it up.
By doing this, you can kill up to the apps at once.
2 Restart iPhone X
If the previous method doesn’t work, you should try restarting your iPhone X. Here’s how to restart iPhone X.
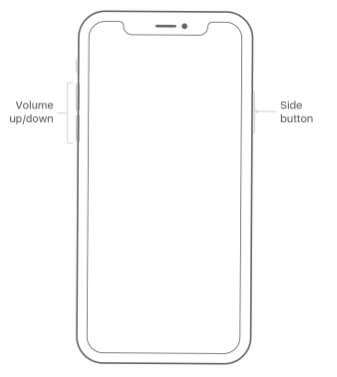
Hold the Side button with a volume button to get the slider appeared.
Drag it to turn off the phone.
Press and hold the Side button to start the device again.
3 Contact Apple Support
Depending on the issue and your location, the way to contact Apple Support may differ. However, you can have all the contact information simply by clicking here.
iPhone backup unlocker:Recover iTunes Backup Password.
iPhone backup extractor free:The best iPhone Backup Extractor software to extract photos, text messages, contacts, voice memos, note, WhatsApp, Viber and etc from iPhone/iPad backup.


Friday, 27 July 2018
How to unroot your Android device – 2019 Comprehensive Guide
How to unroot your Android device – Comprehensive Guide
unroot your Android device – 2019 Comprehensive Guide
Hereafter rooting your device, you will get “superuser” account which means it is similar to the administrative account in the desktop. This superuser account allows users to access all files on the operating system.
Although there are few advantages for rooting android phone such as custom software (ROM), you can install custom themes, you can get rid of ads, speed and performance, increase battery life, you can install unsupported apps etc.
As of now, you have seen its benefits but there are some disadvantages as well such as bricking, losing warranty, malicious software’s, security threats and so on. By rooting your device you have you’re your device vulnerable to all the security threats.
If you root your Android device means you can’t update your rooted android device. You can’t even claim your warrant. That’s the reason why most of the people do want to unroot their Android devices before updating their phone.
Now, let’s know about unrooting.
 Image Credit https://www.androidpit.com/best-free-android-apps
Unrooting:
Unrooting is nothing but the reverse process of rooting. Here, you have to unroot your android device to return it to your stock settings which means your phone will come back to the normal mode. This process will get your warranty back and you can quickly update your device as well.
Now, after seeing this you might think it is best to be in the hands of Google protective arms.
Right?
So, let’s jump into the unrooting process to get your warranty back.
There are plenty of online tutorials readily available to unroot your android device. But the problem is most of the ways are outdated and some process is hard to unroot. So, I have specially created this post to unroot your device quickly.
Let’s get into the process of how to unroot your android devices.
How to Unroot your Android Devices?
In this guide, I will mention five effective ways from where you can uproot your android device. All these methods are easy so you don’t have to worry too much.
Let’s get into the first method of unrooting.
How to Unroot your Android Device by using SUPER SU App:
SuperSU is a popular tool for managing rooted android devices. This is thus far the best and easiest way to unroot your android devices. SuperSU tool is having lots of cool features which are having the ability to unroot your device.
Let’s see the process of unrooting by SUPERSU:
Firstly, Download and install SuperSU app from the Google Play Store.
Then Install that app and launch that app.
After launching the app hover over to the “settings tab”.
Now, Scroll down to the bottom and you will see an option “Full Unroot”.
Click on that “Full Unroot” button. After clicking that you will be asked to confirm that you really want to unroot your device.
Now, Click on continue.
It will take some time and once the process is done SuperSU will close automatically.
And, it will restart your android device.
When your Android device is back to its normal state just uninstall the SuperSU tool.
With this process, you have successfully completed unroot process.
This is an easy process in this post how to unroot your Android device. So follow these steps to simply unroot your android device.
How to Unroot your Android Device by using another android app:
When you want an alternative to SuperSU? You can find few apps but the problem here is you can’t do it perfectly like SuperSU.
Even though there is a slight chance of unrooting your phone by using other apps but it can work in some situations and it won’t work in some situations.
The best option for the unrooting android device after SuperSU is universal Unroot app. This app will easily get rid of the unrooting process but the problem of this app is it will work with only devices.
You can’t unroot Samsung or other Samsung like devices on this app. So, this process is complicated that’s why it is always best to unroot your Android device by using SuperSU. I have mentioned this point in ” how to unroot your Android device” just to give some knowledge in unrooting Android devices.
 How to track lost android phone
Unroot your phone by using a file manager:
Usually, people always think that rooting process is a complicated task. In reality, it is just nothing but a bunch of files rewrite your commands on your phone. That’s it; if you really want to get rid of that root process all you have to do is retrieve your phone to the normal stage by getting rid of those root files.
To get rid of this you can use a file manager with root access. I’m sure that lots of people know about the ES file explorer app because it is an awesome app with great features. With the help of that ES explorer app, you can even unroot your android device.
Although this is a trickier process that the above two process but it will definitely work. Now, if you are wondering how to unroot your android device using ES File explorer means follow below steps.
First and foremost step is, Download and install ES File Explorer from Google Play Store.
Then Launch the ES File Explorer app and click on the Menu.
After going into the menu scroll down until you see the “Tools” option.
Then simply turn on “Root Explorer” in the tools option.
Now, Grant it with root privileges if prompted.
Come back to the main screen.
Navigate to your device’s root folder.
You can find your root folder with this “/” in your explorer.
Now, access your devices main drive and simply look for “System”.
Select “System” and click on the “bin” option.
From there, just delete “busy box” and “su” files.
In case, if you don’t find those files in the process means hover over to the next step.
Go back to the system folder and try selecting “xbin”. If you can see “busybox” and “SU” files over there then you can delete them.
If you cant find them means go to the “/” explorer and open the “app” folder.
Then Search for Superuser.apk files and delete that file.
After deleting that file restart the device.
That’s it your android device is back to normal stage successfully. So, you can enjoy your warranty and you can even update your phone.
Until now you have seen three effective ways on the topic how to unroot your android devices. Now, let’s jump into the untold ways of unrooting devices.
Unroot your android device by installing an OTA update:
Generally, you can unroot your Android device by installing an OTA update. But, remember when I started this post ” How to unroot your Android device” I said that root gets in the way of updating your Android device?
Right?
Did you remember that?
If you are keening following this post means obviously you will remember that. Well, the answer to that question is you really can update your Android device through the traditional and old of ways of installing updates.
But, you can still push and install your updates manually with advanced options. Those options are harder and trickier than other ways. That’s why staying away from those advanced options are best for the normal user. If you are tech freak and having enough knowledge on doing that means you can do that at your own risk.
Now, in this post, I’ll not get into those advanced ways right now. But here I will tell you a simple trick that is whenever you update your software those updates will break the root access of your device. Which means your root access will revert back to the normal state.
Here, most of the root users will root their devices again after they install their updates. But, you are satisfied with normal device means you can easily update your device in the same old and traditional ways.
The main drawback of this method is that you have to wait for an update to arrive manually. Remember one thing you have to uninstall SuperSU or any other root access related app from your device then only you will get the update.
Note: Be careful while updating your device manually and also remember that, this process will only work when you are using stock recovery on your device.
So, be careful with this method of unrooting your android device. Although this is an untold way in most of the “unroot guides” hovering over the web. I have relieved this just to increase your knowledge on how to unroot your android device.
How to Unroot your android device by installing Stock Firmware:
Most of you might be confused with the word stock firmware. Right?
Here Stock firmware is nothing but official software which is specially designed by the device manufacturer for a particular device. The Stock ROM/ firmware is the only thing which does not undergo any type of changes in the code which is written by the manufacturer.
Now, you learnt about stock firmware. So, taking your phone to its original firmware state is another effective way to unroot your phone. With this process, you can easily revert your phone back to its original state.
This process will work despite your devices ROM kernel or without any recovery package. The reason for that is, they all needed software codes are packaged together in this stock firmware that’s why you don’t have to put extra codes on it.
The sad part is this method is complicated when compared to the other methods. Along with that, we can’t quite give you specific mobile configuration tutorial to you. It is mainly because each phone has different ways to accomplish the stock firmware installation. So, we can’t give each and every phone model specific firmware tutorials.
If you really want to do that means do a bit of research on how to do stock firmware on your specific Smartphone model and follow the process. Usually, you have to download their specific firmware files and you have to use USB debugging option and download PC software and do the process.
Here in this article, I am giving a Stock firmware installation method for Samsung devices. Usually, this process works for most of the Samsung devices.
Do remember one thing there is no guarantee that this process will work on all Samsung devices. So be precautions and there is no guarantee on anything. Do it at your own risk.
Samsung Stock ROM via Odin:
Firstly, Back your device and store your backup file on your PC.
Then visit Samsung Official website to quickly find correspondent driver software.
Now, Google the driver software of your android device.
Then download and install it on your PC.
After that, install Kies to install or updated drivers.
Now, Visit Samsung updates and download the Stock firmware of your Samsung device.
Note: Be precautionus and search with your model number.
Find the firmware for your model number and select country and download it.
Then extract the file on your PC.
 Exact the file
Usually, the file types that Odin uses are*.bin,*.tar, and *.tar.md5.
 Files are in .md5 format
After extracting you will find “.md5” file.
Just keep that file aside and move to the next step Odin.
Download Odin latest version from Sam Mobile or find another alternative.
Exact the file on your desktop location.
Then right-click on that and select “Run as administrator”.
 Run As Administrator
Note: Always remember to run Odin as Administrator.
Now, bring your Samsung device into download mode by booting.
To do that, Power off your device.
Press and hold Volume down Key, Power key and Home Key in your Samsung device.
When you feel that your device is vibrating, release power key and keep holding the volume down and home key.
 Warning Screen
You will get a warning screen before you enter into download mode.
Now, press Volume UP key to enter download mode.
The screen will appear as Downloading do not turn off target!!.
 Download Mode
Now as you are in download mode. Quickly connect your device to PC.
While you connect to your PC your device should automatically recognize by Odin.
You will get a notification that says “Added”.
In the meantime, you will see a light blue box with an ID number. Such as “0[COM3]” in ID: COM Box.
 Odin
Odin
Carefully, Click “PDA” or “AP” depends on the Odin version you are using. If you are using new version then click on “AP”.
Now, click on “Start” button after adding the file.
Do not remove or operate on your device until it’s finished or its shows Failed message.
If you notice flash process is done means you I’ll see a big green box saying that “passed” or “Reset”.
 Unrooting passed
If you see that green box means you have unrooted your device successfully.
These are the best methods to unroot your Android devices. if you are wondering how to unroot your Android device means this post will help you a lot.
Conclusion:
So these are best ways to unroot your android device. Now you have all the required information in your hands. So, take your rooted devices and start the process to bring back your warrant. I hope you all enjoyed ” How to unroot your android device” post.
Gihosoft Android data recovery Free is a super awesome software specialized in Android file recovery. With this program, you are able to recover deleted photos, music, videos, messages, contacts, call logs, WhatsApp messages, Viber chat history and more from Samsung, Huawei, LG, HTC, Motorola, Google, Oneplus, Sony, Lenovo, ZTE and other Android devices directly. Meanwhile, this Android data recovery software is available for both Windows and Mac platforms.
If you are having any doubts means let us know in comment section.
unroot your Android device – 2019 Comprehensive Guide
Hereafter rooting your device, you will get “superuser” account which means it is similar to the administrative account in the desktop. This superuser account allows users to access all files on the operating system.
Although there are few advantages for rooting android phone such as custom software (ROM), you can install custom themes, you can get rid of ads, speed and performance, increase battery life, you can install unsupported apps etc.
As of now, you have seen its benefits but there are some disadvantages as well such as bricking, losing warranty, malicious software’s, security threats and so on. By rooting your device you have you’re your device vulnerable to all the security threats.
If you root your Android device means you can’t update your rooted android device. You can’t even claim your warrant. That’s the reason why most of the people do want to unroot their Android devices before updating their phone.
Now, let’s know about unrooting.
Image Credit https://www.androidpit.com/best-free-android-appsUnrooting:
Unrooting is nothing but the reverse process of rooting. Here, you have to unroot your android device to return it to your stock settings which means your phone will come back to the normal mode. This process will get your warranty back and you can quickly update your device as well.
Now, after seeing this you might think it is best to be in the hands of Google protective arms.
Right?
So, let’s jump into the unrooting process to get your warranty back.
There are plenty of online tutorials readily available to unroot your android device. But the problem is most of the ways are outdated and some process is hard to unroot. So, I have specially created this post to unroot your device quickly.
Let’s get into the process of how to unroot your android devices.
How to Unroot your Android Devices?
In this guide, I will mention five effective ways from where you can uproot your android device. All these methods are easy so you don’t have to worry too much.
Let’s get into the first method of unrooting.
How to Unroot your Android Device by using SUPER SU App:
SuperSU is a popular tool for managing rooted android devices. This is thus far the best and easiest way to unroot your android devices. SuperSU tool is having lots of cool features which are having the ability to unroot your device.
Let’s see the process of unrooting by SUPERSU:
Firstly, Download and install SuperSU app from the Google Play Store.
Then Install that app and launch that app.
After launching the app hover over to the “settings tab”.
Now, Scroll down to the bottom and you will see an option “Full Unroot”.
Click on that “Full Unroot” button. After clicking that you will be asked to confirm that you really want to unroot your device.
Now, Click on continue.
It will take some time and once the process is done SuperSU will close automatically.
And, it will restart your android device.
When your Android device is back to its normal state just uninstall the SuperSU tool.
With this process, you have successfully completed unroot process.
This is an easy process in this post how to unroot your Android device. So follow these steps to simply unroot your android device.
How to Unroot your Android Device by using another android app:
When you want an alternative to SuperSU? You can find few apps but the problem here is you can’t do it perfectly like SuperSU.
Even though there is a slight chance of unrooting your phone by using other apps but it can work in some situations and it won’t work in some situations.
The best option for the unrooting android device after SuperSU is universal Unroot app. This app will easily get rid of the unrooting process but the problem of this app is it will work with only devices.
You can’t unroot Samsung or other Samsung like devices on this app. So, this process is complicated that’s why it is always best to unroot your Android device by using SuperSU. I have mentioned this point in ” how to unroot your Android device” just to give some knowledge in unrooting Android devices.
How to track lost android phoneUnroot your phone by using a file manager:
Usually, people always think that rooting process is a complicated task. In reality, it is just nothing but a bunch of files rewrite your commands on your phone. That’s it; if you really want to get rid of that root process all you have to do is retrieve your phone to the normal stage by getting rid of those root files.
To get rid of this you can use a file manager with root access. I’m sure that lots of people know about the ES file explorer app because it is an awesome app with great features. With the help of that ES explorer app, you can even unroot your android device.
Although this is a trickier process that the above two process but it will definitely work. Now, if you are wondering how to unroot your android device using ES File explorer means follow below steps.
First and foremost step is, Download and install ES File Explorer from Google Play Store.
Then Launch the ES File Explorer app and click on the Menu.
After going into the menu scroll down until you see the “Tools” option.
Then simply turn on “Root Explorer” in the tools option.
Now, Grant it with root privileges if prompted.
Come back to the main screen.
Navigate to your device’s root folder.
You can find your root folder with this “/” in your explorer.
Now, access your devices main drive and simply look for “System”.
Select “System” and click on the “bin” option.
From there, just delete “busy box” and “su” files.
In case, if you don’t find those files in the process means hover over to the next step.
Go back to the system folder and try selecting “xbin”. If you can see “busybox” and “SU” files over there then you can delete them.
If you cant find them means go to the “/” explorer and open the “app” folder.
Then Search for Superuser.apk files and delete that file.
After deleting that file restart the device.
That’s it your android device is back to normal stage successfully. So, you can enjoy your warranty and you can even update your phone.
Until now you have seen three effective ways on the topic how to unroot your android devices. Now, let’s jump into the untold ways of unrooting devices.
Unroot your android device by installing an OTA update:
Generally, you can unroot your Android device by installing an OTA update. But, remember when I started this post ” How to unroot your Android device” I said that root gets in the way of updating your Android device?
Right?
Did you remember that?
If you are keening following this post means obviously you will remember that. Well, the answer to that question is you really can update your Android device through the traditional and old of ways of installing updates.
But, you can still push and install your updates manually with advanced options. Those options are harder and trickier than other ways. That’s why staying away from those advanced options are best for the normal user. If you are tech freak and having enough knowledge on doing that means you can do that at your own risk.
Now, in this post, I’ll not get into those advanced ways right now. But here I will tell you a simple trick that is whenever you update your software those updates will break the root access of your device. Which means your root access will revert back to the normal state.
Here, most of the root users will root their devices again after they install their updates. But, you are satisfied with normal device means you can easily update your device in the same old and traditional ways.
The main drawback of this method is that you have to wait for an update to arrive manually. Remember one thing you have to uninstall SuperSU or any other root access related app from your device then only you will get the update.
Note: Be careful while updating your device manually and also remember that, this process will only work when you are using stock recovery on your device.
So, be careful with this method of unrooting your android device. Although this is an untold way in most of the “unroot guides” hovering over the web. I have relieved this just to increase your knowledge on how to unroot your android device.
How to Unroot your android device by installing Stock Firmware:
Most of you might be confused with the word stock firmware. Right?
Here Stock firmware is nothing but official software which is specially designed by the device manufacturer for a particular device. The Stock ROM/ firmware is the only thing which does not undergo any type of changes in the code which is written by the manufacturer.
Now, you learnt about stock firmware. So, taking your phone to its original firmware state is another effective way to unroot your phone. With this process, you can easily revert your phone back to its original state.
This process will work despite your devices ROM kernel or without any recovery package. The reason for that is, they all needed software codes are packaged together in this stock firmware that’s why you don’t have to put extra codes on it.
The sad part is this method is complicated when compared to the other methods. Along with that, we can’t quite give you specific mobile configuration tutorial to you. It is mainly because each phone has different ways to accomplish the stock firmware installation. So, we can’t give each and every phone model specific firmware tutorials.
If you really want to do that means do a bit of research on how to do stock firmware on your specific Smartphone model and follow the process. Usually, you have to download their specific firmware files and you have to use USB debugging option and download PC software and do the process.
Here in this article, I am giving a Stock firmware installation method for Samsung devices. Usually, this process works for most of the Samsung devices.
Do remember one thing there is no guarantee that this process will work on all Samsung devices. So be precautions and there is no guarantee on anything. Do it at your own risk.
Samsung Stock ROM via Odin:
Firstly, Back your device and store your backup file on your PC.
Then visit Samsung Official website to quickly find correspondent driver software.
Now, Google the driver software of your android device.
Then download and install it on your PC.
After that, install Kies to install or updated drivers.
Now, Visit Samsung updates and download the Stock firmware of your Samsung device.
Note: Be precautionus and search with your model number.
Find the firmware for your model number and select country and download it.
Then extract the file on your PC.
Exact the fileUsually, the file types that Odin uses are*.bin,*.tar, and *.tar.md5.
Files are in .md5 formatAfter extracting you will find “.md5” file.
Just keep that file aside and move to the next step Odin.
Download Odin latest version from Sam Mobile or find another alternative.
Exact the file on your desktop location.
Then right-click on that and select “Run as administrator”.
Run As AdministratorNote: Always remember to run Odin as Administrator.
Now, bring your Samsung device into download mode by booting.
To do that, Power off your device.
Press and hold Volume down Key, Power key and Home Key in your Samsung device.
When you feel that your device is vibrating, release power key and keep holding the volume down and home key.
Warning ScreenYou will get a warning screen before you enter into download mode.
Now, press Volume UP key to enter download mode.
The screen will appear as Downloading do not turn off target!!.
Download ModeNow as you are in download mode. Quickly connect your device to PC.
While you connect to your PC your device should automatically recognize by Odin.
You will get a notification that says “Added”.
In the meantime, you will see a light blue box with an ID number. Such as “0[COM3]” in ID: COM Box.
OdinCarefully, Click “PDA” or “AP” depends on the Odin version you are using. If you are using new version then click on “AP”.
Now, click on “Start” button after adding the file.
Do not remove or operate on your device until it’s finished or its shows Failed message.
If you notice flash process is done means you I’ll see a big green box saying that “passed” or “Reset”.
Unrooting passedIf you see that green box means you have unrooted your device successfully.
These are the best methods to unroot your Android devices. if you are wondering how to unroot your Android device means this post will help you a lot.
Conclusion:
So these are best ways to unroot your android device. Now you have all the required information in your hands. So, take your rooted devices and start the process to bring back your warrant. I hope you all enjoyed ” How to unroot your android device” post.
Gihosoft Android data recovery Free is a super awesome software specialized in Android file recovery. With this program, you are able to recover deleted photos, music, videos, messages, contacts, call logs, WhatsApp messages, Viber chat history and more from Samsung, Huawei, LG, HTC, Motorola, Google, Oneplus, Sony, Lenovo, ZTE and other Android devices directly. Meanwhile, this Android data recovery software is available for both Windows and Mac platforms.
If you are having any doubts means let us know in comment section.
Thursday, 26 July 2018
How to ditch your iPhone for Android—and take your files with you
How to ditch your iPhone for Android—and take your files with you
First, you need to carefully extricate yourself from Apple's iOS ecosystem, full of native apps like iMessage, iTunes, and others. In this guide, we'll lay out some of the hoops you need to jump through to preserve your data, and explain what you can bring with you and what you can't.
Do you already use Google or Microsoft apps?
Switching over will be a lot easier if you already use Google and Microsoft apps on your iPhone. In fact, the same goes for any cloud-based apps, including Netflix and Spotify. Because they store everything online, these apps make it very straightforward to jump between devices and across platforms.
If you lean on Google programs, then when you get your new Android device, it should come with these apps pre-installed. All you'll have to do is log in, and your data—your archived Gmail emails, your Google Maps history, your Hangouts messages—will appear.
Even if you're not all-in on Google, Microsoft makes top-quality apps for both iOS and Android. If you rely on Outlook and Office on your iPhone, then go ahead and install the same apps on your Android device, log in, and enjoy.
In general, if you plan to switch frequently between Android and iOS devices, stick to platform-agnostic apps that work similarly on both operating systems. They'll make the process extremely easy. However, if your iPhone relies heavily on Apple's own apps, then the swap will require a substantial amount of work, because Apple doesn't make many of its programs available on Android. Read on for more information on dealing with this issue.
Move text messages and email
To keep track of your past chats, you'll want to bring your iMessage and email conversations with you. That's only partially possible.
The sad fact is, you cannot transfer your iMessage conversations from iOS over to Android. Apple doesn't make an Android version of its app, nor does it allow any other developers to access it, so you're out of luck. Mac users can check iMessage from their computers, but others won't be able to access the app after jumping to Android.
So before you leave, make sure to de-link your mobile number from iMessage—assuming you're taking it with you to your new phone. Go to Settings > Messagesand toggle off the iMessage switch. Then visit Settings > FaceTime and turn off the FaceTime toggle switch as well. This removes the association between your phone number and Apple's proprietary services, which will prevent you from having any problems receiving messages or calls on your new Android handset. If you forget to do this step before you get rid of your iPhone, don't worry—perform the task remotely at this web page.
Luckily, you can bring the Apple emails stored in iCloud. You just need to import them into Android's Gmail app: Open Gmail on your new phone, tap the Menubutton on the top left, hit your Google account, and select Add account > Other. Now enter your iCloud username and password. (If your Apple account uses two-step authentication, you'll first need to create a Gmail-specific password at this web page.) Now you can either keep using your iCloud email address within the Gmail app, or just treat those old messages as an archive and switch to a Gmail address.
Move contacts, calendars, photos, and home videos
It's relatively easy to transfer some of the items you store in iCloud—such as your contacts, calendars, photos, and videos—to Google's servers. But you need to start this process before you ditch your iPhone.
First, download the Google Drive for iOS app to your old device. Open it and sign in with your Google account credentials. Next, tap the Menu button on the top left, followed by the cog icon and then Backup. Now you'll see a list of items, including Contacts, Calendar events and Photos & videos. Select all of the entries that you want to transfer to your new Android phone.
Now, tap Start Backup and copies of this iPhone data will move to Google Contacts, Google Calendar, and Google Photos. Now you'll be able to access your files when you sign into your Google account on your new Android phone.
A quick note on photos and videos: These files will transfer to Google Photos, which gives you an unlimited amount of storage—as long as you agree to let it resize your photos down to 16 megapixels and your videos down to a 1080p resolution. If you opt to store this data at their original quality, they will count against your cloud storage quota. Google Drive gives you a total of 15GB of free storage space, shared across Drive, Gmail, and Google Photos. The latter can really eat up your quota if you choose to store images at full resolution. But if you end up needing more room, you can pay to upgrade: Prices start at $2 a month for 100GB.
Move music, movies, and TV shows
Apple only makes one app that really works with Android: Apple Music. If you subscribe to the service, then you can take all your playlists and songs with you on your leap to Android, including files you've uploaded from your iTunes account. However, you do have to pay a subscription fee to keep using the app.
That said, not all of us choose Apple Music. If you prefer a different app, and you still want to transfer your MP3s to an Android device, you can do so using a computer with Google Play Music. Open your computer's web browser, head to Google Play Music's web portal, click the Menu button on the top left of the page, and choose Upload music. Now drag tracks from your local storage into your browser window. You can do this same thing through the program's desktop uploader. Either way, your files will sync to the cloud, and you'll be able to stream or download them through the Google Play Music app on your new Android device.
Movies and TV shows are more complicated, because Apple doesn't make an iTunes video player for Android. You can watch your existing iTunes videos on other devices, such as a Mac, Apple TV, or iPad, but not on an Android phone or tablet. However, any videos you obtained from non-iTunes sources should be just fine. Streaming apps—like Plex, Netflix, Hulu, HBO Go, and of course Google Movies & TV—all work seamlessly across Android and iOS. Just log into your account on your new device and you'll be good to go.
Move documents and other files
Now that you've tackled most of your files, all that's left to move are documents and other strays. Your method for shifting them to Android will depend on the iOS app where you store them.
For example, cloud-storage programs Google Drive and Dropbox work seamlessly across Android and iOS. We'd recommend you download one of these options to your old phone, use it to save your iPhone files, and then log into the same app on your new device.
What about files saved to Apple's office suite? You won't find Pages, Numbers, or Keynote apps available for the Android platform. So, if you have files created in these apps, you'll need to export them in a common format. Open a file with the app, tap the Menu button (three dots) on the top right of the screen, and pick Export. Choose either a PDF or Microsoft Office format (both will work fine with the Google Drive, Dropbox, and Microsoft Office apps for Android), then select a save location. If you've installed Google Drive or Dropbox on your iPhone, go ahead and save it there.
That's just about all you need to transfer. After all, your cloud-based apps, including social media, will work exactly the same as soon as you log into them on your new device. Go forth and leave Apple behind! If you lost videos from iOS Camerall Roll which are nowhere to download again, you can use Gihosoft iPhone Data Recovery to get back deleted videos from iOS device including iPhone, iPad and iPod Touch.
Jihosoft iPhone Backup Extractor Extract and recover all types of data from iPhone backup files, such as camera roll photos, videos, SMS, contacts, reminders, WhatsApp, and etc.
Gihosoft Android data recovery Free is a super awesome software specialized in Android file recovery. With this program, you are able to recover deleted photos, music, videos, messages, contacts, call logs, WhatsApp messages, Viber chat history and more from Samsung, Huawei, LG, HTC, Motorola, Google, Oneplus, Sony, Lenovo, ZTE and other Android devices directly. Meanwhile, this Android data recovery software is available for both Windows and Mac platforms.
Wednesday, 25 July 2018
How to Change DPI Density on Android Without Root Or PC
How to Change DPI Density on Android Without Root Or PC
Change DPI Density on Android Without Root Or PC
As we all know, the Android OS offers limited possibilities that have made it gain a lot of popularities over the years. Sometimes you look at your Android smartphone and its display (icon and texts) seems too big while you’d prefer to have more contents (data) displayed on your screen.
If we take a look at PC’s, you can easily change your font-size and icon size by changing your display resolution. The same effect applies to the Android OS, but in this regard, we alter the DPI (dot per inch) on Android devices to get the better display we want.
Read also: How to Convert Emulated Storage to Non Emulated in Custom ROMs
Don’t get it wrong, DPI is different from screen resolution.
Difference between DPI and Resolution?
Basically, Resolution is a measure of how many pixels a display can show, vertically and horizontally eg. 640×480. While DPI which is also referred to as Display Independence is the measure of digital screen pixel density. eg. 640×480 on a 15′ display.
How to Change DPI Density on Android (No root – No PC)
If you’re a custom ROM lover, by now you’d have realized all the custom ROM features is gradually coming back to stock Androids. I guess the search giant is now realizing the importance of each of these small but significant features and implementing them on their newer OS versions.
With Android Nougat upgrade, one of the important features users with small screen display have always wanted came onboard. Yes, I am talking about changing the DPI density of Android display.
However, in the Android OS, it’s not exactly called change DPI in the options but you’ll find it in some custom ROMs as DPI. In the Android OS, it’s basically referred to as “Display Size”.
So, without further ado, let’s go down to the step by step guide on how to Change DPI Density on Android device without root or PC.
Read also: How to Make GIF Images From Videos In WhatsApp Messenger
Steps to Change DPI Density on Android
The two methods which we’re about to discuss will only work on devices running Android Nougat and above. However, if you’re running a custom ROM based on lower Android versions (Marshmallow or Lollipop), you may find this options in your device. But, if you’re running stock Android and you still wish to change your device DPI, see my previous article on changing DPI with PC without root.
First Simple Method To Change DPI Density:
Like I have said earlier, you need to be running Android Nougat and above to alter display density.
Step 1 – Open Settings from your app drawer or from your shortcut panel.
Step 2 – Scroll down and select “Display” in the options list.
Depending on your device, in the display option, you’ll find “Display size” while on some other device, you’ll find “Font size” and “Display size” in the Display option.

Sponsor Ads:
Are You Kidding Me? Deleted Files Are Not Really Gone?
In fact, you don't need to cry, as the deleted files are not really gone, they are still on your disk, and can be can be restored before it is overwritten by the new data. Wonder how to recover deleted files from Android quickly? Just refer to the following tutorials.
To recover deleted files from Android, you may need an Android data recovery software, like Gihosoft Free Android Data Recovery. With exquisite design and superb technology, this Android recovery software has won praise from the outside world.

Key Features of Gihosoft Android Data Recovery:
- One-click recover deleted or lost contacts, messages, call logs, photos, music, videos, WhatsApp and Viber conversations, etc. from Android phones and tablets.
- Suitable for all kinds of Android devices, like Samsung Galaxy S9/S9+/S8/S8+, Huawei P20/Mate 10/10 Pro, HTC U11+, LG V30/G7, Motorola, Google Pixel, OnePlus, ZTE, etc.
- With a user-friendly interface and in-depth scanning technology, it can quickly help users find lost data for whatever reason. And Fully compatible with Windows and Mac systems.
Step-by-Step Simple Guide on Gihosoft Android Data Recovery:
1.Run Gihosoft Android Data Recovery on your computer and select the file types you want to recover from Android phones or tablets, then tap "Next" to begin.
2. Connect your Android phone to PC via a USB cable (make sure USB debugging is enabled on your phone). When connected, tap "Start" to scan the lost data on Android.
3. After that, you can preview the scanned data. If you find the data you want to recover, tap "Recover" to recover deleted files from Android.

Note: Please tap "Allow" to authorize the program on your phone screen if a message pop up when you connect your Android phone to the computer. For some reason, you may need to install the corresponding Android USB Driver on the computer. Just follow the instructions given by the program, you can recover deleted data from Android without any loss in content.
As a powerful file recovery apps for Android, Gihosoft Android Data Recovery can be used for various types of data recovery, such as recover deleted photos from Android, recover deleted messages from Android, recover deleted contacts from Android, and so on.
3 Methods to Recover Deleted WhatsApp Messages on iPhone
3 Methods to Recover Deleted WhatsApp Messages on iPhone
1. Recover Deleted Messages from WhatsApp iCloud Backup
WhatsApp will not save your daily data on its servers, so it can't help you recover deleted messages. However it allows you to back up your chat history and media to iCloud by setting up chat backup on WhatsApp settings.
Step 1: Make sure that you have backed up WhatsApp messages in iCloud or turned on auto backup before. To check this, simply go to WhatsApp → Settings → Chats → Chat Backup.


Step 2: Uninstall WhatsApp and verify your phone number after reinstalling it from the App Store. Then you will see a welcome notice prompting you to restore chat history. Simply tap on Restore Chat History and you shall get back your deleted WhatsApp messages once the restore process is completed.

2. Restore Deleted WhatsApp Messages from iTunes Backup
If you have the habit of backing up your iPhone to iTunes regularly, you can recover deleted WhatsApp messages from the iTunes backups with easy operation.
1. Open iTunes and connect your iPhone.
2. click on iPhone icon and select Restore Backup...
3. Select the backup file contains the WhatsApp messages you want, and click the button Restore.

Note: This method may lead to the loss of new data that you are yet to back up.
3. Retrieve Deleted WhatsApp Messages from iCloud Backups
You can check the iCloud backup status by going to Settings > iCloud > Backup. Please make sure iCloud backup has activated in your iPhone so that this method can take effect.
Step 1: Go to Settings → General → Reset → Erase All Content and Settings.
Step 2: Follow the instructions on the Setup screen until you get to "Apps & Data" and then select "Restore from iCloud Backup."
Step 3: Select the relevant iCloud Backup and then keep the device connected to a Wi-Fi network until the restore process is complete.

You may also like:
Sponsor Ads:
Gihosoft Free iPhone Data Recovery is a professional iPhone Data Recovery software to get back all your lost text message, photo, video, call history, note, contact and more from iPhone/iPad/iPod Touch. It offers a full solution to recover your lost data in different tough situations. Besides recovering data directly from iPhone, iPad and iPod touch, it also allows you to recover data from iCloud and iTunes backup files.
Gihosoft Android data recovery Free is a super awesome software specialized in Android file recovery. With this program, you are able to recover deleted photos, music, videos, messages, contacts, call logs, WhatsApp messages, Viber chat history and more from Samsung, Huawei, LG, HTC, Motorola, Google, Oneplus, Sony, Lenovo, ZTE and other Android devices directly. Meanwhile, this Android data recovery software is available for both Windows and Mac platforms.
1. Recover Deleted Messages from WhatsApp iCloud Backup
WhatsApp will not save your daily data on its servers, so it can't help you recover deleted messages. However it allows you to back up your chat history and media to iCloud by setting up chat backup on WhatsApp settings.
Step 1: Make sure that you have backed up WhatsApp messages in iCloud or turned on auto backup before. To check this, simply go to WhatsApp → Settings → Chats → Chat Backup.
Step 2: Uninstall WhatsApp and verify your phone number after reinstalling it from the App Store. Then you will see a welcome notice prompting you to restore chat history. Simply tap on Restore Chat History and you shall get back your deleted WhatsApp messages once the restore process is completed.
2. Restore Deleted WhatsApp Messages from iTunes Backup
If you have the habit of backing up your iPhone to iTunes regularly, you can recover deleted WhatsApp messages from the iTunes backups with easy operation.
1. Open iTunes and connect your iPhone.
2. click on iPhone icon and select Restore Backup...
3. Select the backup file contains the WhatsApp messages you want, and click the button Restore.
Note: This method may lead to the loss of new data that you are yet to back up.
3. Retrieve Deleted WhatsApp Messages from iCloud Backups
You can check the iCloud backup status by going to Settings > iCloud > Backup. Please make sure iCloud backup has activated in your iPhone so that this method can take effect.
Step 1: Go to Settings → General → Reset → Erase All Content and Settings.
Step 2: Follow the instructions on the Setup screen until you get to "Apps & Data" and then select "Restore from iCloud Backup."
Step 3: Select the relevant iCloud Backup and then keep the device connected to a Wi-Fi network until the restore process is complete.
You may also like:
Sponsor Ads:
Gihosoft Free iPhone Data Recovery is a professional iPhone Data Recovery software to get back all your lost text message, photo, video, call history, note, contact and more from iPhone/iPad/iPod Touch. It offers a full solution to recover your lost data in different tough situations. Besides recovering data directly from iPhone, iPad and iPod touch, it also allows you to recover data from iCloud and iTunes backup files.
Gihosoft Android data recovery Free is a super awesome software specialized in Android file recovery. With this program, you are able to recover deleted photos, music, videos, messages, contacts, call logs, WhatsApp messages, Viber chat history and more from Samsung, Huawei, LG, HTC, Motorola, Google, Oneplus, Sony, Lenovo, ZTE and other Android devices directly. Meanwhile, this Android data recovery software is available for both Windows and Mac platforms.
How to fix iPhone Battery Draining Fast All of a Sudden After iOS 12 Update?
How to fix iPhone Battery Draining Fast All of a Sudden After iOS 12 Update?
1. Check the Apps Which Are Consuming the Most Power
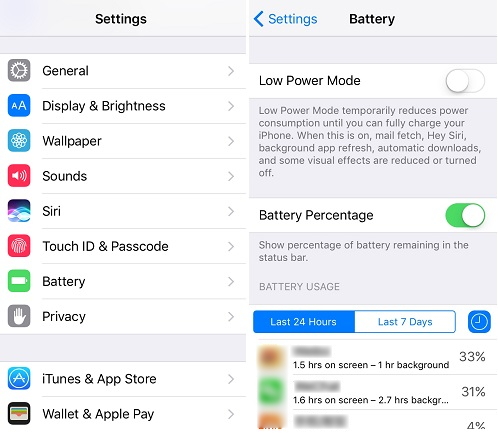
When you observe iPhone battery draining fast all of a sudden after iOS 12 update, you need to examine all the apps and check which are eating up the batter most. To do this, open 'Settings' and tap on 'Battery'. Under the 'BATTERY USAGE' option, you could see the apps and the figures given next to each app shows how much battery is consuming by the app. Switch to 'Last 24 Hours' to see how much battery is consumed during the previous day. On finding the battery consuming apps, delete those or you can simply ask the app developer about the issue.
2. Update Apps on Your iPhone
The apps that are not updated, at times stand considerable for sudden iPhone battery dropping. This is because, on an available app update, the apps might try to get automatically updated in the background and hence this could result in draining battery. In addition, an outdated app will work improperly and lead to sudden draining of power. Therefore, just open 'App Store' in your device and tap on 'Update All' at the top to update your apps.

3. Close All the Apps in Background When Not in Use
You probably have no idea about closing the apps once you use it. For your information, the apps you use run in the background even after you exit those and because they're still running in the background, they could be responsible of a sudden draining of iPhone battery. Hence to improve battery life, we recommend you to close those apps so that the battery doesn't rapidly drops any longer.
Hit on the 'Home' button twice and let the app switcher on. You could notice how many apps are opened that you used recently. Swipe up the apps one by one and close them.

4. Use iTunes to Restore iPhone to Factory Settings
Restoring the device to factory settings is also helpful. If you're facing a circumstance where your iPhone battery suddenly drops after updating to iOS 12, try to restore your iPhone. However, this will lead to data loss. So try this method if you're comfortable with it.
Open the latest iTunes version and get your iPhone connected to the PC via USB cable.
After opening, click on device icon and then hit 'Summary'.
Now, click on 'Restore iPhone' and confirm the actions. Wait for a few munites, and then your iPhone will restart and be back to normal.

5. Replace the Battery
If nothing worked out for you what is mentioned above and your battery is still draining fast all of a sudden in iOS 12, we would like to suggest you to replace the battery. It would be a fair decision for such battery draining case and when any of the above methods is working for you.

6. Tip: How to Save Battery on iPhone
After learning the solutions to try when iPhone battery suddenly drops after iOS 12 update, here are the tips you should know if your wish to save battery on iPhone.
Firstly, note to keep the 'Background App Refresh' option disabled. You can find it in the 'General' menu from 'Settings'. The feature, if enabled can lead to reduced battery life by keeping the device active and running things in background.
You need to check software updates time and again since every new update brings fixes with it thereby possibly improving the battery life.
The next tip says and suggests you to turn off the location services. Go to 'Settings' > 'Privacy' > 'Location Services' and disable it by toggling the switch off. Tap 'Turn Off' from pop-up to confirm. Keeping this feature constantly enabled uses GPS which will surely affect the battery life.If you lost videos from iOS Camerall Roll which are nowhere to download again, you can use Gihosoft iPhone Data Recovery to get back deleted videos from iOS device including iPhone, iPad and iPod Touch.
Jihosoft iPhone Backup Extractor Extract and recover all types of data from iPhone backup files, such as camera roll photos, videos, SMS, contacts, reminders, WhatsApp, and etc.
Gihosoft Android data recovery Free is a super awesome software specialized in Android file recovery. With this program, you are able to recover deleted photos, music, videos, messages, contacts, call logs, WhatsApp messages, Viber chat history and more from Samsung, Huawei, LG, HTC, Motorola, Google, Oneplus, Sony, Lenovo, ZTE and other Android devices directly. Meanwhile, this Android data recovery software is available for both Windows and Mac platforms.
1. Check the Apps Which Are Consuming the Most Power
When you observe iPhone battery draining fast all of a sudden after iOS 12 update, you need to examine all the apps and check which are eating up the batter most. To do this, open 'Settings' and tap on 'Battery'. Under the 'BATTERY USAGE' option, you could see the apps and the figures given next to each app shows how much battery is consuming by the app. Switch to 'Last 24 Hours' to see how much battery is consumed during the previous day. On finding the battery consuming apps, delete those or you can simply ask the app developer about the issue.
2. Update Apps on Your iPhone
The apps that are not updated, at times stand considerable for sudden iPhone battery dropping. This is because, on an available app update, the apps might try to get automatically updated in the background and hence this could result in draining battery. In addition, an outdated app will work improperly and lead to sudden draining of power. Therefore, just open 'App Store' in your device and tap on 'Update All' at the top to update your apps.
3. Close All the Apps in Background When Not in Use
You probably have no idea about closing the apps once you use it. For your information, the apps you use run in the background even after you exit those and because they're still running in the background, they could be responsible of a sudden draining of iPhone battery. Hence to improve battery life, we recommend you to close those apps so that the battery doesn't rapidly drops any longer.
Hit on the 'Home' button twice and let the app switcher on. You could notice how many apps are opened that you used recently. Swipe up the apps one by one and close them.
4. Use iTunes to Restore iPhone to Factory Settings
Restoring the device to factory settings is also helpful. If you're facing a circumstance where your iPhone battery suddenly drops after updating to iOS 12, try to restore your iPhone. However, this will lead to data loss. So try this method if you're comfortable with it.
Open the latest iTunes version and get your iPhone connected to the PC via USB cable.
After opening, click on device icon and then hit 'Summary'.
Now, click on 'Restore iPhone' and confirm the actions. Wait for a few munites, and then your iPhone will restart and be back to normal.
5. Replace the Battery
If nothing worked out for you what is mentioned above and your battery is still draining fast all of a sudden in iOS 12, we would like to suggest you to replace the battery. It would be a fair decision for such battery draining case and when any of the above methods is working for you.
6. Tip: How to Save Battery on iPhone
After learning the solutions to try when iPhone battery suddenly drops after iOS 12 update, here are the tips you should know if your wish to save battery on iPhone.
Firstly, note to keep the 'Background App Refresh' option disabled. You can find it in the 'General' menu from 'Settings'. The feature, if enabled can lead to reduced battery life by keeping the device active and running things in background.
You need to check software updates time and again since every new update brings fixes with it thereby possibly improving the battery life.
The next tip says and suggests you to turn off the location services. Go to 'Settings' > 'Privacy' > 'Location Services' and disable it by toggling the switch off. Tap 'Turn Off' from pop-up to confirm. Keeping this feature constantly enabled uses GPS which will surely affect the battery life.If you lost videos from iOS Camerall Roll which are nowhere to download again, you can use Gihosoft iPhone Data Recovery to get back deleted videos from iOS device including iPhone, iPad and iPod Touch.
Jihosoft iPhone Backup Extractor Extract and recover all types of data from iPhone backup files, such as camera roll photos, videos, SMS, contacts, reminders, WhatsApp, and etc.
Gihosoft Android data recovery Free is a super awesome software specialized in Android file recovery. With this program, you are able to recover deleted photos, music, videos, messages, contacts, call logs, WhatsApp messages, Viber chat history and more from Samsung, Huawei, LG, HTC, Motorola, Google, Oneplus, Sony, Lenovo, ZTE and other Android devices directly. Meanwhile, this Android data recovery software is available for both Windows and Mac platforms.
Friday, 13 July 2018
How to Root an Android Phone or Tablet Without a Computer 2018 Guide
Why do you Need to Root your Phone?
For average user rooting your android phone is not necessary but for that heavy or curious user that want to explore more on what your Android phone can do. Some reasons involve are like the following:
Change your Android OS Version to the latest or later one.
Install apps to block ads.
Ability to uninstall unnecessary apps that come with the phone after you bought it.
Tweak startup logos and other cool stuff.
Rooting your Android device will give you the ability to use Game Killer App this app can hack games/apps money, gold, coins or any resources.
Requirements
An Android device (phone or tablet)
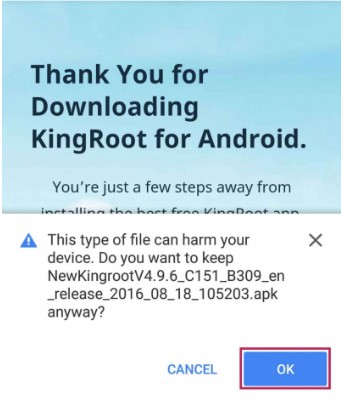
Download KingRoot app for Android (After you download this app you might encounter a warning from your browser that this app is malicious and might harm your phone. This is false positive, but anyway use at your own risk) See image below.
Up to 50% of battery.
Start Rooting your Android Device
After you download the Kingroot app. You may install it now.
Take note that if you are installing an app outside Google Playstore you will a warning about “Install Blocked” to overcome this simply click on the settings>security> and tick on the “Install from unknown sources”

The installation will begin its process.
After the installation, all you need to do is click on the “START ROOT” process.
Wait for a few minutes…
Done! Check out the image below.
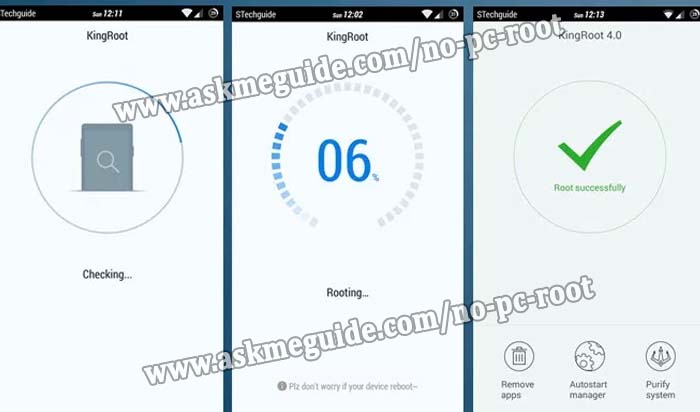
And that’s how you android root without a computer! To check out that your phone is truly rooted. Please install Root Checker app from Google Play Store.
You can also visit this page http://askmeguide.com/tutorial-how-to-root-android-phone-without-pc/ for a detailed the same tutorial. Rooting your Android device will give you full control over your phone or tablet and will give you extra space for expansion that normal android phone cannot do. However, a rooted Android phone will void any warranty you have on your phone. Some phone will do not support to be rooted as well.Sponsor Ads:
Gihosoft Free iPhone Data Recovery is a professional iPhone Data Recovery software to get back all your lost text message, photo, video, call history, note, contact and more from iPhone/iPad/iPod Touch.
Gihosoft Android data recovery Free is a super awesome software specialized in Android file recovery. With this program, you are able to recover deleted photos, music, videos, messages, contacts, call logs, WhatsApp messages, Viber chat history and more from Samsung, Huawei, LG, HTC, Motorola, Google, Oneplus, Sony, Lenovo, ZTE and other Android devices directly. Meanwhile, this Android data recovery software is available for both Windows and Mac platforms.
For average user rooting your android phone is not necessary but for that heavy or curious user that want to explore more on what your Android phone can do. Some reasons involve are like the following:
Change your Android OS Version to the latest or later one.
Install apps to block ads.
Ability to uninstall unnecessary apps that come with the phone after you bought it.
Tweak startup logos and other cool stuff.
Rooting your Android device will give you the ability to use Game Killer App this app can hack games/apps money, gold, coins or any resources.
Requirements
An Android device (phone or tablet)
Download KingRoot app for Android (After you download this app you might encounter a warning from your browser that this app is malicious and might harm your phone. This is false positive, but anyway use at your own risk) See image below.
Up to 50% of battery.
Start Rooting your Android Device
After you download the Kingroot app. You may install it now.
Take note that if you are installing an app outside Google Playstore you will a warning about “Install Blocked” to overcome this simply click on the settings>security> and tick on the “Install from unknown sources”
The installation will begin its process.
After the installation, all you need to do is click on the “START ROOT” process.
Wait for a few minutes…
Done! Check out the image below.
And that’s how you android root without a computer! To check out that your phone is truly rooted. Please install Root Checker app from Google Play Store.
You can also visit this page http://askmeguide.com/tutorial-how-to-root-android-phone-without-pc/ for a detailed the same tutorial. Rooting your Android device will give you full control over your phone or tablet and will give you extra space for expansion that normal android phone cannot do. However, a rooted Android phone will void any warranty you have on your phone. Some phone will do not support to be rooted as well.Sponsor Ads:
Gihosoft Free iPhone Data Recovery is a professional iPhone Data Recovery software to get back all your lost text message, photo, video, call history, note, contact and more from iPhone/iPad/iPod Touch.
Gihosoft Android data recovery Free is a super awesome software specialized in Android file recovery. With this program, you are able to recover deleted photos, music, videos, messages, contacts, call logs, WhatsApp messages, Viber chat history and more from Samsung, Huawei, LG, HTC, Motorola, Google, Oneplus, Sony, Lenovo, ZTE and other Android devices directly. Meanwhile, this Android data recovery software is available for both Windows and Mac platforms.
Wednesday, 11 July 2018
Fix iTunesHelper Not Running in Windows 10, 8 or 7 PC
What is iTunes Helper?
iTunes Helper or iTuneshelper.exe file is a background software component of iTunes that was developed by Apple Computer Inc. to seamlessly launch iTunes whenever an iPhone, iPad, or iPod touch is plugged into computer PC.
What’s the Function of the iTunesHelper.exe File?
As a “.exe” file (i.e. executable file), iTunesHelper is a software/file that contains the step-by-step instruction that a Windows operating system follows to launch iTunes software on your computer. Hence, you won’t be able to use iTunes on your computer if the iTunesHelper.exe file is missing or corrupt.Gihosoft iPhone Data Recovery Free:https://www.gihosoft.com/iphone-data-recovery-free.html
Why and When Will iTunesHelper Not Running?
One of the major possible reasons why your iTunesHelper.exe file is not working in because of virus/malware corrupt .exe files which were not properly scanned for viruses before opening in your PC.
Some of the most common iTunesHelper error messages that are likely to be seen when starting up iTunes on a windows PC include:
iTunesHelper.exe Application Error
iTunesHelper.exe is not a valid Win32 application
iTunesHelper.exe has encountered a problem and needs to close We are sorry for the inconvenience
Cannot find iTunesHelper.exe
iTunesHelper.exe not found
Error starting program: iTunesHelper.exe
iTunesHelper.exe is not running
iTunesHelper.exe failed
Faulting Application Path: iTunesHelper.exe
On the question of ‘when do iTunesHelper errors occur’, we would say that these errors messages appear mostly during computer startup, iTunes startup, or while trying to use a specific function in iTunes.
Note: at the point where the iTunesHelper.exe error occurs is a crucial piece of information in fixing it.
Subscribe to:
Comments (Atom)
iPhone 11 and iPhone 11 Pro Camera Settings You Must Know About
With the iPhone 11 and iPhone 11 Pro, Apple has finally managed to deliver an iPhone that challenges other flagship Android smartphones in t...

-
Hearthstone : Heroes of Warcraft is now available for Android tablets. The popular title by game maker Blizzard Entertainment is finally li...
-
Xiaomi Redmi Note 4G Budget Phablet Unboxing & Overview Xiaomi Redmi Note 4G Unboxing first boot & hands on Overview, the Redmi N...
-
One of the most annoying problems with iPhone/iPad users is when the device is connected a computer and ready for syncing, but you find out...
